
Introduction | Creating insta-BMs | Size does matter | Avoid screwups | Advanced BM'ing | War BM'ing | Organize | Conclusion
The beginner scout will attempt to fly out to 15 km beyond a gate, carefully align, and spend a good amount of time and effort only to set a crappy bookmark.
...strangely, same insta-BM will appear to work perfectly when warping to 20 km instead of 15.
How comes ?
Problem is, while containers are point-sized (1m), stations and gates vary widely in size.
Because of that, activating the display of object's size in your scanner can prove handy.
With this basic know-how, it's pretty obvious the bigger an object is, the easier it is to set an insta-BM that will land any ship within activation range.
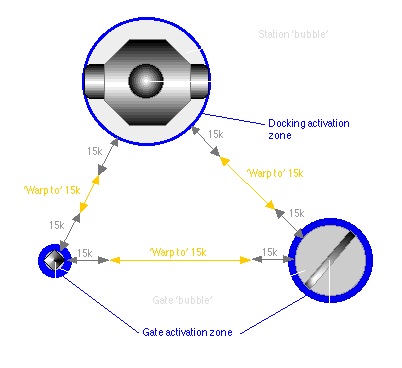 While your warping vector is aligned on the dead-center of the Destination object, the warp-exit distance (15 km in 'Warp to 15') refers to the object's periphery (the Bubble) and not its center.
Interestingly enough, as far as activation range is concerned the size as reported by the scanner is correct, no matter the geometry of an object or your angle of approach - hence the notion of Bubble rather than polygonal periphery for BM'ing.
[WTN: collision detection actually relies on polygonal periphery, not Bubble, allowing you to approach well within the '0' distance on big objects like stations.]
The perfect insta-BM lands you just in front of the gate/station you aim at, somewhere between the periphery of the activation zone and the bubble of the object itself, thus ensuring than even an heavy inertia-induced drift won't drag you beyond the opposite limit of the activation zone.
Activations zones are defined by the action range, which are pretty straightforward.
A cargo container can be opened within 1500m, station's docks hauling can be activated within 500m and gates allow you to jump within 2500m.
[Pre-Exodus recent patches, not all ships decelerated post-warp as quickly, and some ships could actually travel a good distance after their warp exit point before the pilot regained the ability to navigate, so it was needed to keep on the safe side of things when setting up BMs.
In this case, the safe side of things was the front side, i.e. the outward limit of the object that faces the direction you come from when warping in.
If your BM was set to bring a theoretical ship (shuttle or Pod) just within this effective limit of the object, you had a healthy 'safe zone' for a slower decelerating ship to drift through and still remain within activation range ; on the other hand, you don't want your ship to come shy of the effective area either, which is why you usually wanted to shoot for the front of the object bubble instead of the front of the activation bubble.]
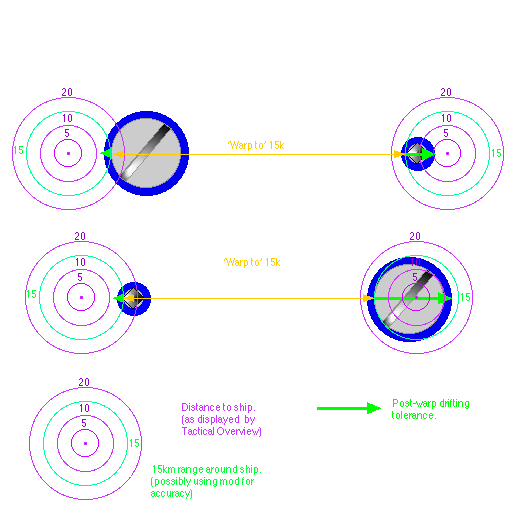
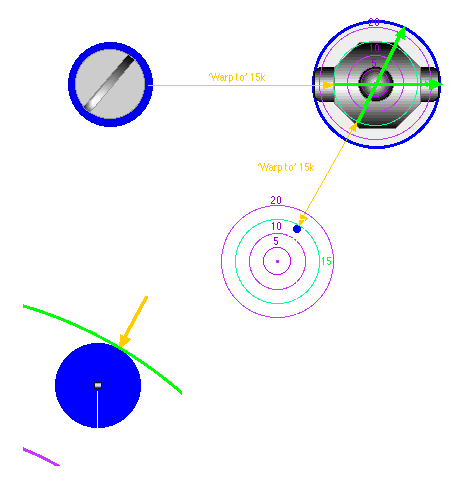
In any case, your new best friends since Exodus are the new tactical overview and its ability to display the nominal range of modules in 3d. Just fit a module with a 15k range and you got yourself a pitch perfect way to control where your ship (and therefore BM) is, relative to the object you plan to insta-warp to.
As can be seen from the above figures, and provided you're perfectly aligned, the rule for how far beyond the object to set a BM used to be pretty straightforward: substract the object size from your desired 'warp to' distance (usually 15). That should land you right on the Bubble border - hence within activation range - and any drift will only bring you closer to the center of the Bubble, not outwards its 'rear' border.
Hence the exact formula to determine accurately at which distance the BM should be set beyond the object goes like this:
[When it used to be: (WarptoDistance) - (ObjectSize+ObjectActivationRange)](WarptoDistance) - [(ObjectSize/2)+1]
Very small objects require the most careful bookmarking, and for those you may want to accurately factor in their activation bubble instead of the object bubble, because those extra 500 to 2.5k meters can be the difference between a hit or miss on a 1m object.
Conversely, any object with an activation bubble larger than 30 km offers the opportunity to create a bulls-eye insta-BM that will work no matter the approach vector.
Under current revision of Eve (patch 3211), so to reduce odds of bouncing, the BMs are subject to a random drifting effect from their creation exact position. This makes important to be extra-careful when BM'ing instas for small objects (smaller than 5km) to avoid overshooting targets when warping.
Move on to next section Advanced BM'ing
Introduction | Creating BMs | Size does matter | Avoid screwups | Advanced BM'ing | War BM'ing | Organize | Conclusion